Android User Guide for TeamHaven Mobile Version 2
- Installation
- Opening the app
- Logging In
- Main Menu
- Calls Menu
- Planned By Date
- Map
- By Category
- Unplanned
- Ready to Send
- Call Lists
- Opening a Call
- Call Location Tab
- Directions
- Call Details Tab
- Planning a call
- Review Call
- Starting a Call
- Checking In
- During the Call
- GPS Sign In
- Form Index
- Navigating between forms
- Form Types
- Question Types
- Barcode Scanning
- Saving a call
- Closing a call
- Checking Out
- Synchronising
- Messages
- Settings
- Support
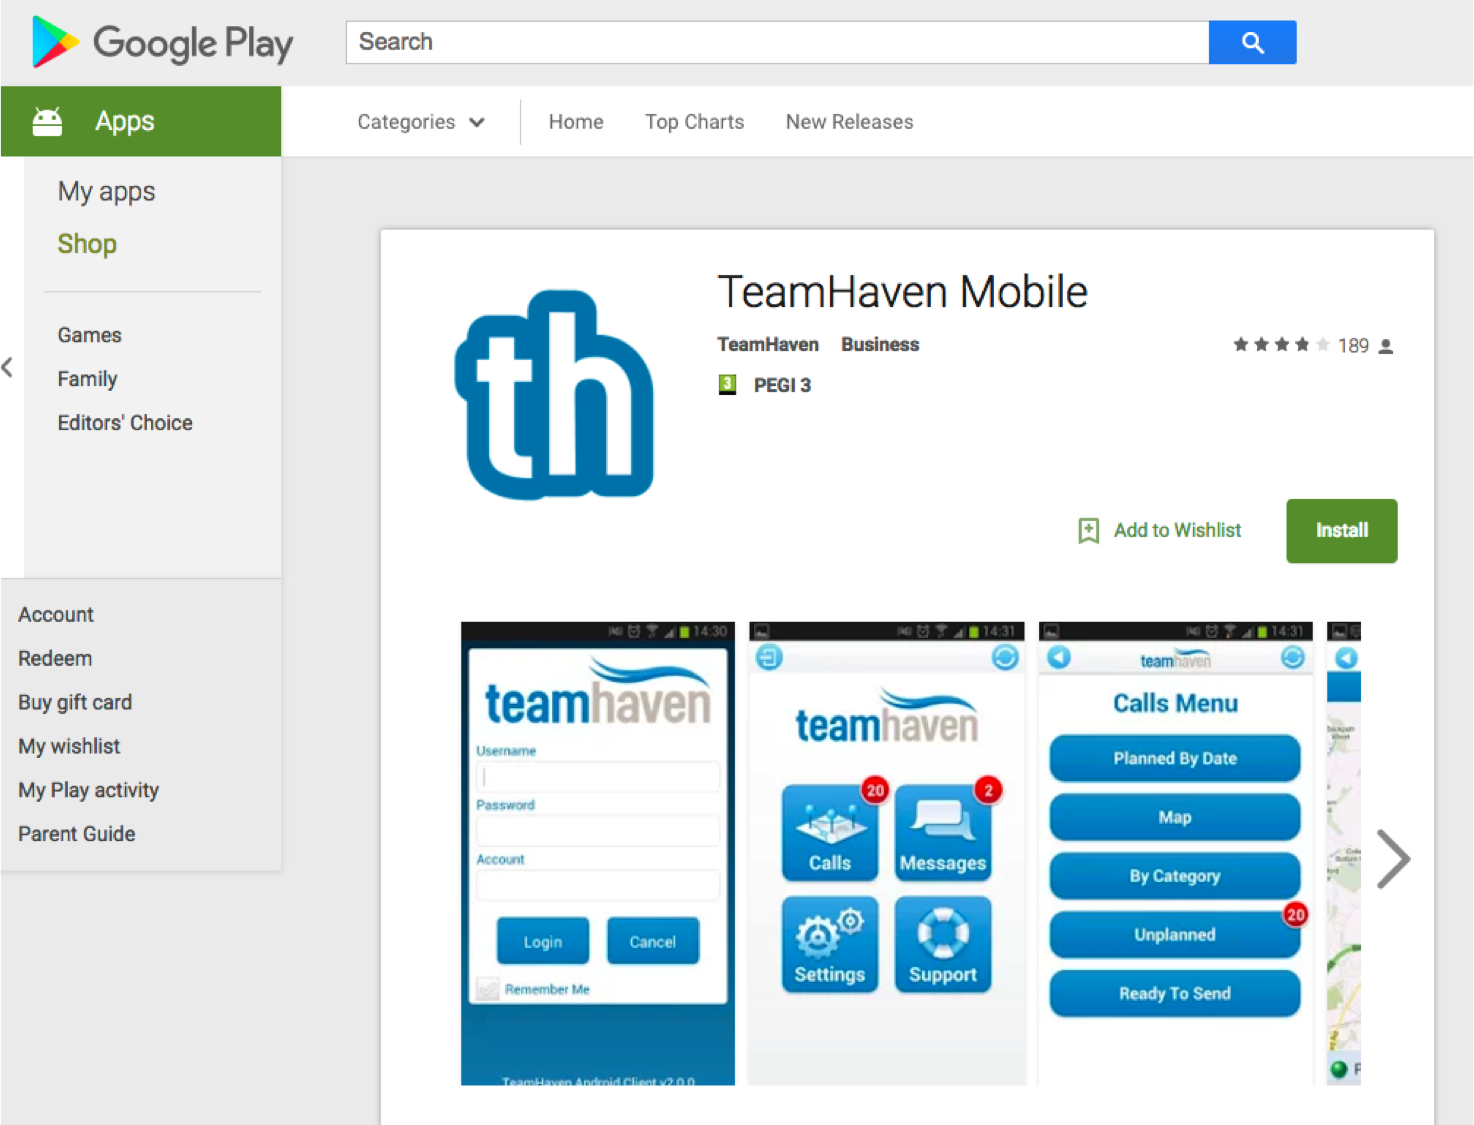
You can download TeamHaven Mobile from the Google Play Store. This should already be on your device, if not, please contact your Account Administrator.
Note: A Google Mail account is required to download apps from the Google Play Store.
To find the app, search for "TeamHaven Mobile". There should only be one matching application. Verify that the publisher is "TeamHaven Ltd" before selecting "Install" and then "Accept & Download".
If you would like the app to automatically update please tick the "Allow automatic updating" box. This makes sure that you will always receive bug fixes and new features. We recommend keeping your device always up-to-date. It is also recommended that you synchronise regularly to ensure the safety of your collected data before any automatic updates.
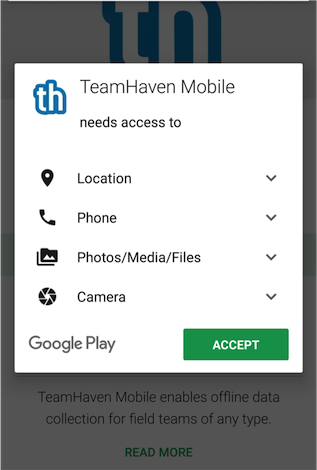
You will be presented with the following screen before the app is fully installed. This screen informs you what functions the app is requiring to access. This is normal and please do allow full access for the app otherwise it will not work properly.
Select "Install" to continue and you will be notified when the app is successfully installed. You can then press "Open" to start TeamHaven Mobile or "Done" to return to the Android home screen.
Once you have downloaded the app you will find it in the applications section of the device. Look for the icon below and select it to open the application.
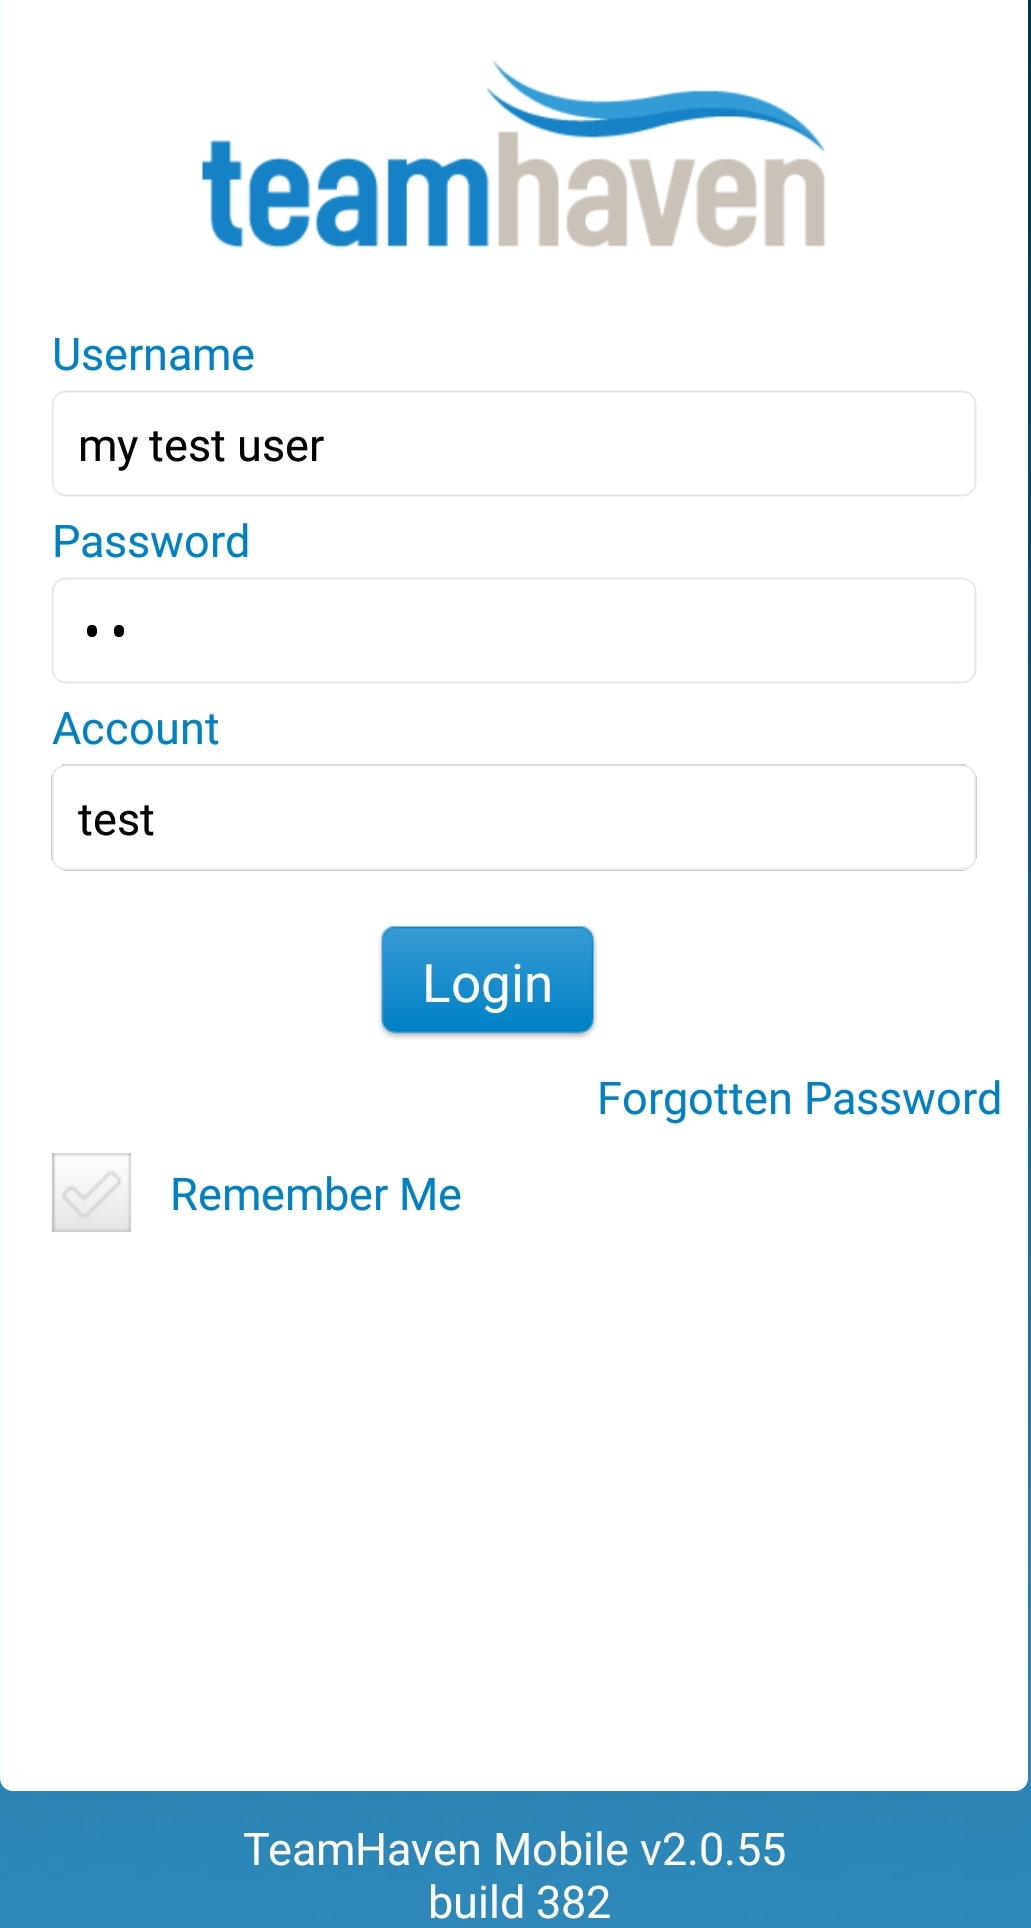
The first screen that you will see is the Login Page. Here you will need to enter your username, password and account name. The user name and account fields are not case sensitive but your password is!
Note: If you do not yet have this information please get in touch with your Account Administrator.
Once you have entered your details, press the "Login" button and TeamHaven Mobile will automatically start synchronising with the TeamHaven server. Be patient while the synchronisation completes and then the Main Menu will be displayed.
If you have forgotten your password or if you wish to change the password, then please click on Forgotten Password text.
For this to work correctly you will need an email address saved against your TeamHaven profile (one that you can access) and also the account you are working for must have the "password reset" function allowed.
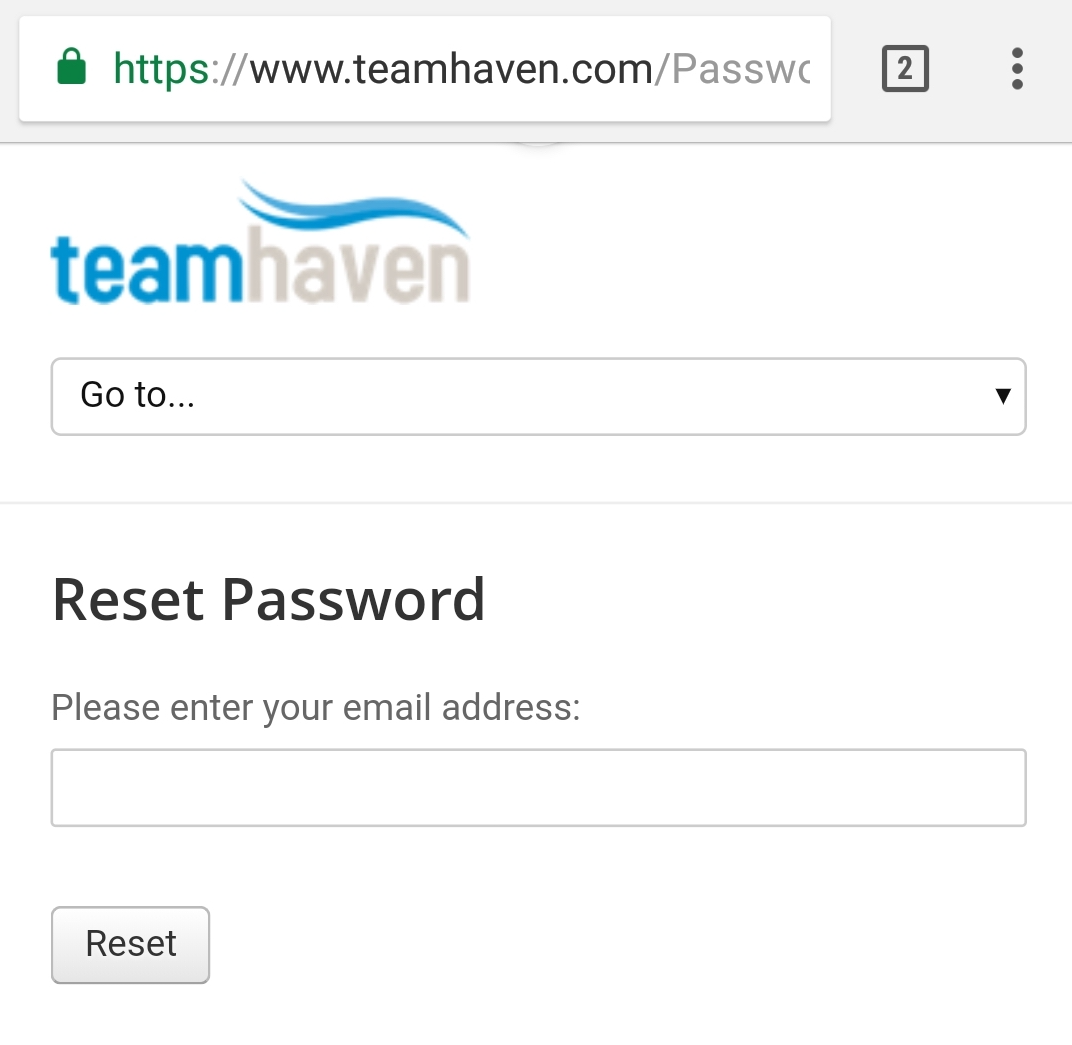
Once you select the reset button you will be redirected to the page below and you need to enter your email address. The reset link will be emailed to you. Please make sure the email you enter is the one that is associated with your TeamHaven user profile.
Note: passwords must follow our security criteria:
- Minimum of 8 characters
- No username or account name combinations
- No "password" "TeamHaven" or "test" type phrases.
For more details on how to get started using TeamHaven Mobile please read our dedicated guide here.
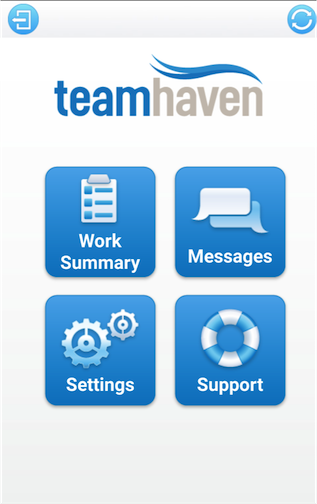
When you have logged in you will be placed on the main menu. From here, you can navigate throughout the app easily.
This page is the main access point of all the activities as well as the documentation you will have access to.
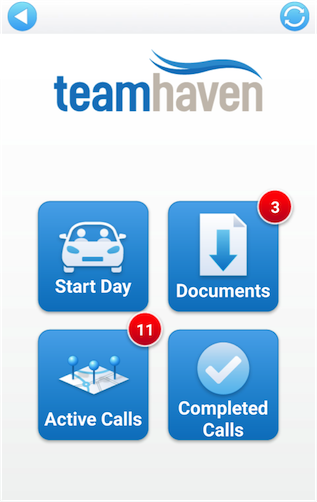
A notification number will appear the 'Documents' and 'Active Calls' tiles to show how many calls or documents there are. The number for documents represents unread files, once they have been read it a notification will no longer show on the 'Documents' tile.
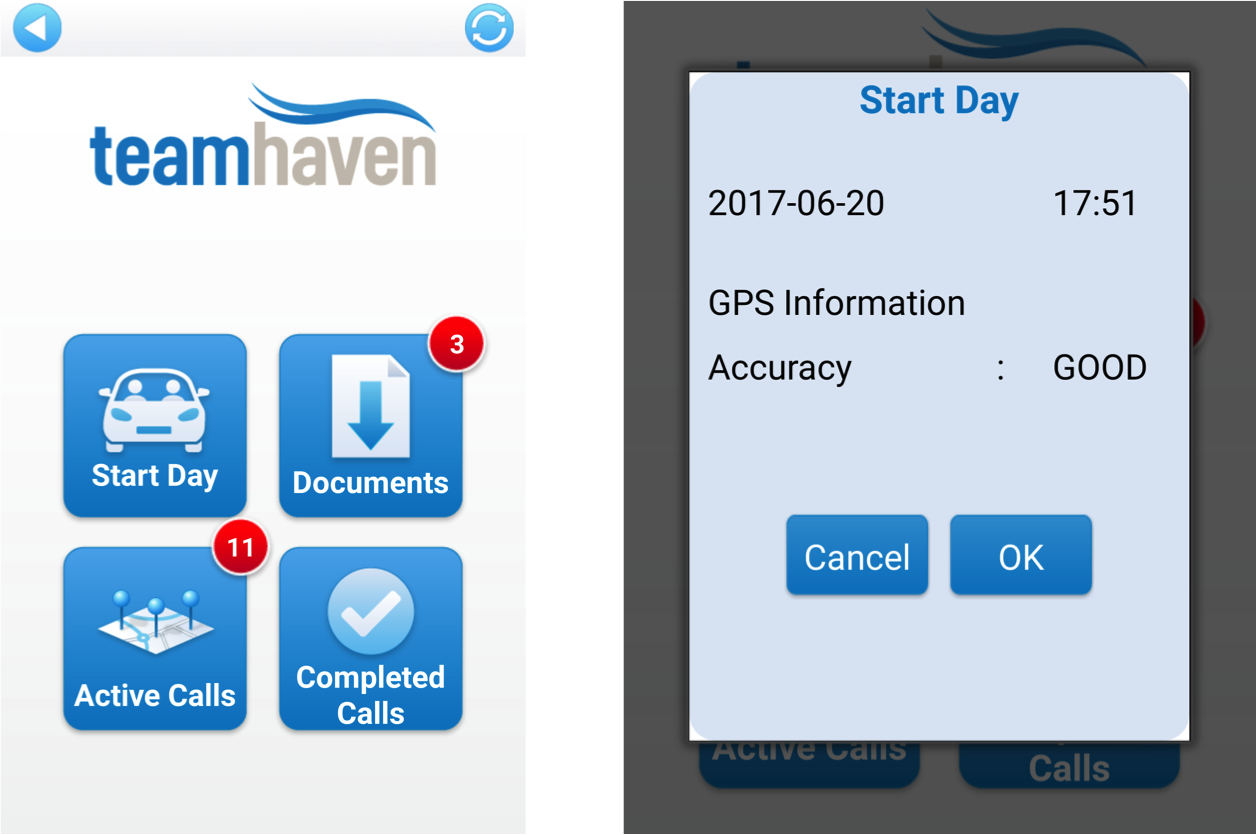
This functionality is designed for if you are away from your normal home address (or the address stored within your TeamHaven profile). It allows you to capture this temporary location as your start and end of day location.
Before any calls are completed you must click on the start day function. This captures your GPS location as well the date and time.
If you are claiming milage and your travel time is part of your working hours then please lease with you Employer directly regarding the expected routine for managing this within TeamHaven Mobile. If you are not required to use such function but you still engage it please note that TeamHaven will capture and store this information even if it may not be used for reporting purposes.
After your daily activities are completed you will need to click on 'end day' which again captures your location and date/time. This flags your day as complete.
Note if you start a day and you forget to close it the system will automatically close the day for you at midnight.
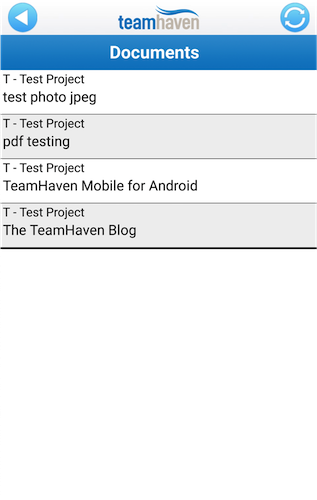
In this menu point you will find all files that are shared with you. For the function and use of such files please contact your employer.
The files in your library should already be formatted in a way which allows you to open them but if you are experiencing issues opening any files please contact your employer and report the issue to them.
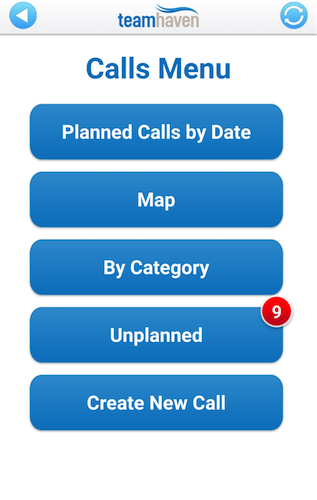
When you select the Active Calls button you will be placed on the ‘Calls Menu’, here you can navigate through all of the active calls that are currently on your device. Each section of the calls menu may have its own notification; this will show you how many calls are available in each section.
Calls will be grouped – the grouping will be determined by your Project Manager. Calls may be grouped by postcode or town for example. If no grouping has been determined, calls will be listed under ‘No Group’.
Hint: You will see that the logout icon has now changed into an arrow, this is your ‘Back’ button; use this whenever you want to move through your previous pages.
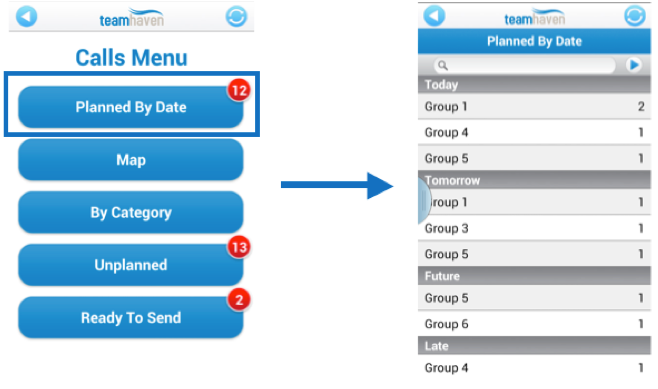
This section will contain all calls that have a planned start date. As mentioned above they will display in groups – within this section they will also be categorized into date groups, for example ‘Today’, ‘tomorrow’ or ‘late’.
Only calls that have been given a planned start date will display in this section.
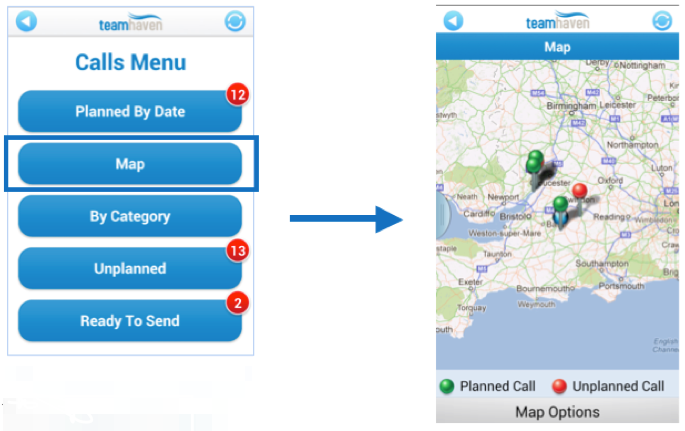
The ‘Map’ section will show you your current location as well as your available calls on the map. You can zoom in and out of the map by pinching the screen (for those devices that don’t include screen pinching technology, zoom buttons will appear at the bottom of the map for this purpose) and you can pan to see more around you..
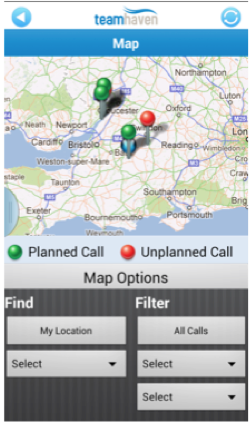
Map Options
To open the options tap ‘Map Options’, here you can find specific targets or filter the calls by date categories (e.g. today, tomorrow, future, etc.) or by group name. The Map Options will close after each selection or when you touch the map.
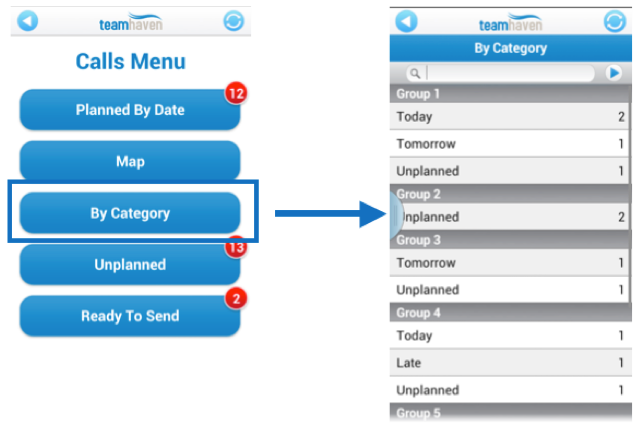
The ‘By Category’ section groups calls by planned status, for example ‘today’, ‘tomorrow’ or ‘unplanned’. The calls are also categorized by the grouping name, in this example ‘Group 1’, ‘Group 2’, etc.
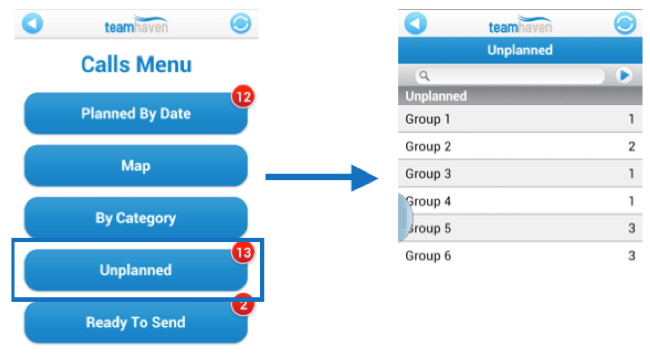
This section will display your unplanned calls only; these are the calls that do not have a planned start date.
You can search by group name using the search bar at the top of this screen.
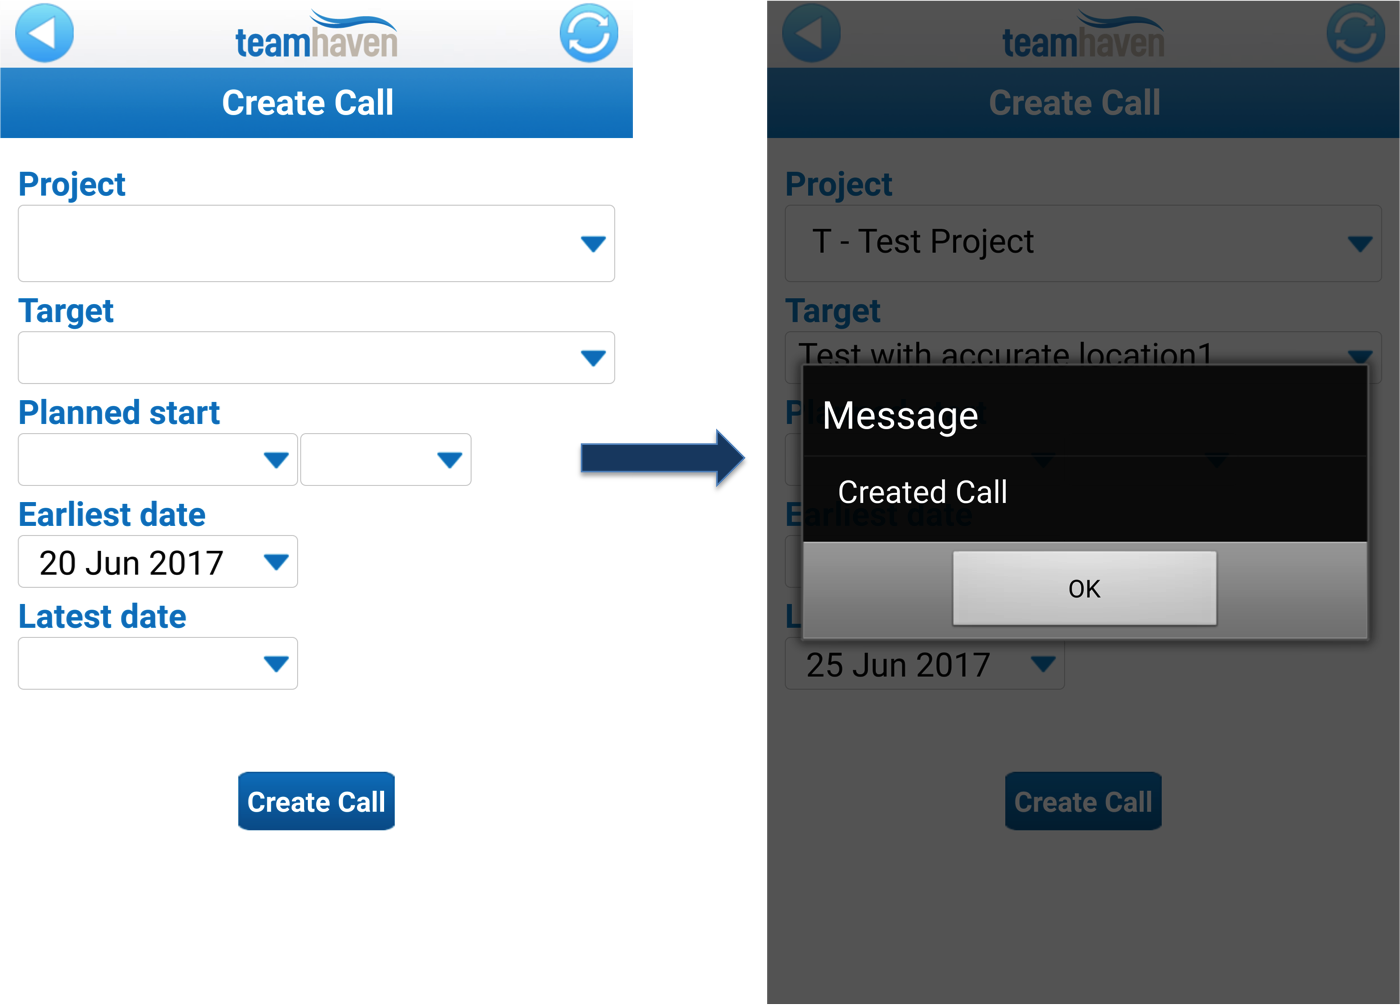
Using the drop down, select the Project that you would like to create a call for – please note that if you are only linked to one project, then you will only get one option at this point and you must have a connection in order to successfully create a call.
Once a project is selected, it will take a few moments for the app to load the targets that are relevant to the project. Clicking on the target selector will display all relevant targets in a list.
Then, using the date picker, add a planned start for the call (if you are not sure when the calls with take place, please use any date within the execution window). Please note that this is a mandatory field.
Add both the earliest and the latest date of the call using the date picker and then press 'Create Call’. Your planned start date should be between these dates.
All visits that you have completed and saved will be displayed in this menu point. You can reopen a completed visit to apply changes to it but its important to note that your visit duration will reflect this reopen. Your next save will give the overall end time for your call.
Calls that have been saved, but not checked out of, will appear in a separate section here.
Once you have completed your calls for the day you will need to synchronise your device, you can do this from the main menu by selecting the icon in the top right corner.
Syncing your device will send your completed calls through to TeamHaven, pick up any new calls and pick up any new messages.
The sync button will be available in the top bar across a number of different screens, you can sync whenever this is visible.
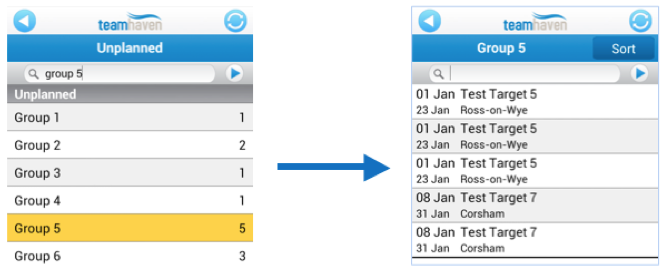
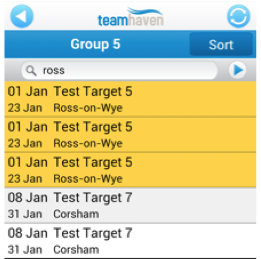
Calls are grouped into different sections based on certain criteria (see ‘Calls Menu’) in order to open a call you will need to open the appropriate group by selecting the group name, for example if you were on the ‘Unplanned’ calls page you may want to look at all unplanned calls. In this case I have searched for ‘Group 5’.
The second image displays your call list - this displays all unplanned calls within ‘Group 5’.
## Searching
Within the call list you can search for calls by looking specifically for the targets name or town.
Hint: You can also search for part of a word. For example, if I wanted to search for calls for ‘Test Target 7’ I could just search for ‘7’ and it will highlight the above two calls.
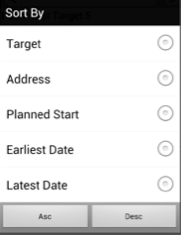
You may have noticed the ‘Sort’ button on the right hand side next to the group name (see screenshots above). Here you can organise your call list based on target/call information. This can be organised in ascending or descending order based on your preference.
You can open a call from your call list, by selecting the call that you would like to enter, you will then be placed on the location tab.
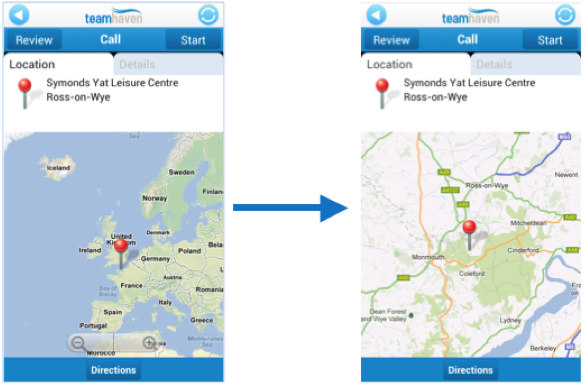
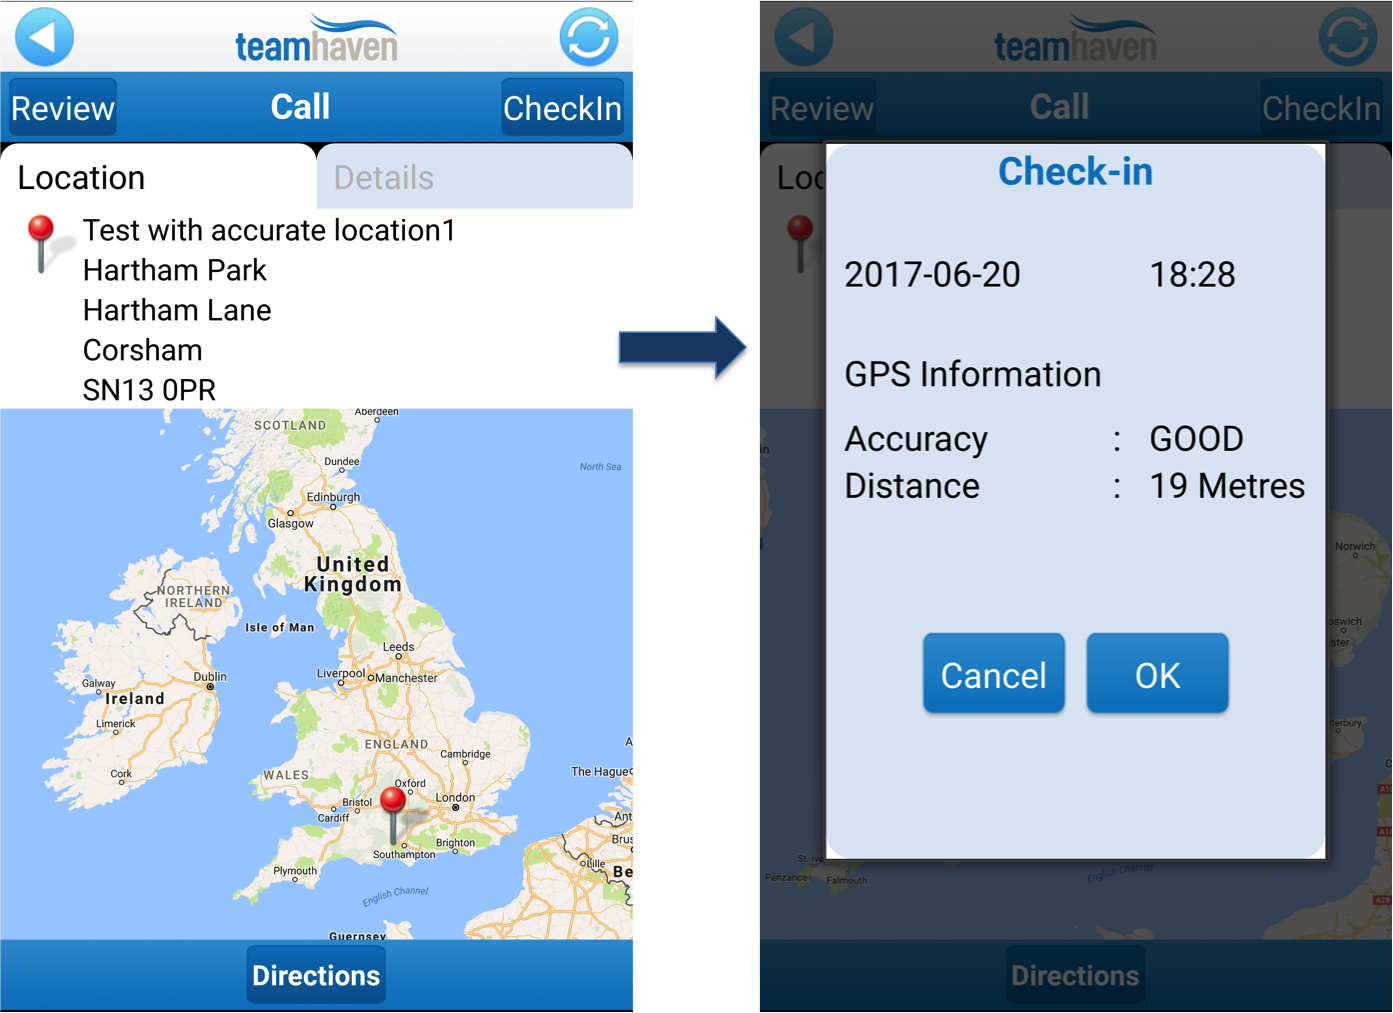
When you open a call you will see two tabs at the top, the location tab is the automatic default here. As you can see, this tab includes a map and the address details for the calls target and, providing the target has a valid location in TeamHaven, it will be pinned on the map.
The available address details for your target will display in the white section above the map. The colour of the pin is determined by the calls planned status, unplanned calls will have a red pin and planned calls will have a green pin.
You may need to zoom into your targets location, and you can use the pinch screen function on your device. As mentioned previously, some devices do not have this pinch screen technology. In these instances, zoom buttons will automatically appear at the bottom of the map.
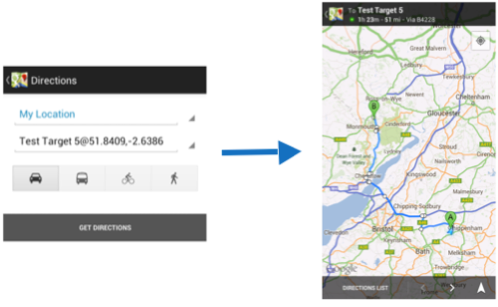
You also have the option to get directions to your target. Select the ‘Directions’ button at the bottom of the call location tab (see screenshot above), this will link to the built in map service (available on most Android devices) which will pull your current location and give you directions to the target.
You may be placed on a page similar to this; select ‘Get Directions’ and the device should find your route. However, this may differ between different devices.
Hint: If you are having issues with the target locations please contact your account administrator.
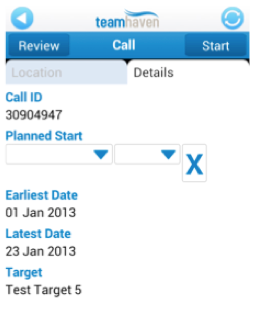
To access details for the call you must select the ‘Details’ tab. This tab contains extra information about the call and the target. Here you will find the unique call ID for to the call you are viewing.
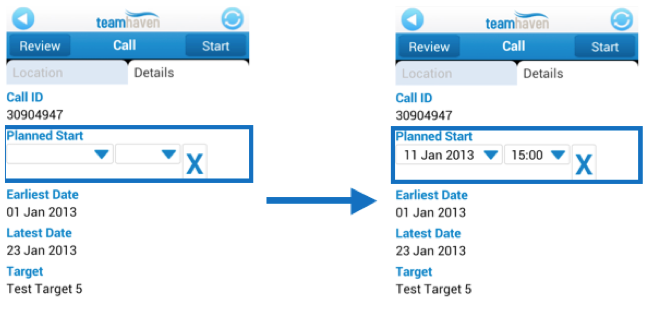
You have the ability to give the calls on your device a planned start date and time; you will find this in the details tab for each call. If a call has no planned start date the two drop down boxes (marked below) will be blank, select these to give a planned start date and time. If you enter the wrong date, select the ‘X’ and try again.
> To check that you have saved the planned start date of your call, navigate back to the ‘Planned by Date’ section of the calls menu using the back button in the top left corner to see if your call appears under the correct date.
This option will allow you to look at the functionality of the questionnaire to see exactly what you need to do during the visit and how it will all work.
You may notice that there is no option to save the questionnaire in review mode, but the data you entered will transfer into the questionnaire when you select the “Start” button.
Select the ‘Review’ button next to the page title.
Note: The start date and time of the call may not match the actual date and time the call was started but instead the time that the you selected “review”.
To start entering the data into your call, you must select the ‘Start’ button in the top right-hand corner of the screen.
The check in facility gives project managers the opportunity to track your activity throughout the day. The check in facility is project specific, so Administrators have the ability to choose which of your projects would benefit from it.
If the check in facility is enabled, you must select the “Check In” button before you can begin entering data into your call.
The “Check In” button will be located to the right of the page title, when a call is selected.
Once you have selected “Check In” the details will appear on your screen, and it will include the date, time and GPS Information. It may sometimes take a short time to show a location, depending on address accuracy and signal.
You will need to select “Ok” to move onto completing the call.
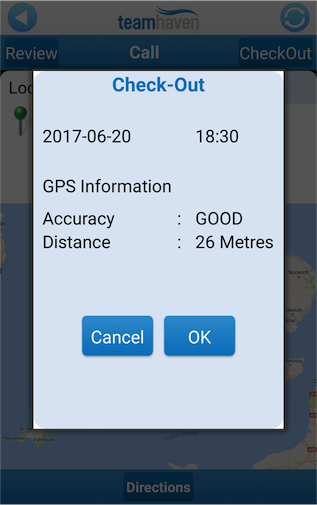
This gives an indication of how accurately your device has been able to determine your location. This can be affected by buildings, trees and even clouds! Most devices use a combination of GPS, Wi-Fi and cell phone towers to determine your location. This will be displayed as either “GOOD” or “BAD”.
Why is my signal quality bad?
GPS (signal from satellite) Sometimes the signal drops and you may need to wait for links with the satellite to re-establish again. Satellite signal can be interrupted by a number of things: bad weather, being in a location with a metal structure - which blocks the signal, indoors of large malls, etc.
Phone Signal (3G / 4G) The number of masts that are visible to the phone are a factor in the accuracy of defining the phone’s location. For example if the device is only visible to 2 masts then the location will be less accurate than if it was visible to 3. If the mobile network is unable to pick up 3 or more masts the quality will drop and it is likely to start providing approximate locations.
Wifi This will give the location of the hub not the phone. This could explain why people could seem further away from the target than they actually are. A single wifi location will give you a range of where you are, whereas a number of wifi connections will give you an exact location.
This will display the estimated distance in metres between your location and the location of the target you are visiting.
Note: You will receive a warning if the distance between your current location and the target's location is too far. Please be aware that your distance from the target's location will be recorded and your manager will have access to this information.
When you are happy that your location is correct select “continue” or “OK”.
There are certain errors that you will not able to rectify due to these being related to project level settings. Please contact your manager for further assistance.
The server rejected your attempt to check into this call.
- The normal reason for this is that you are no longer assigned to the call. Contact your Project Manager for assistance.
The server rejected your attempt to check out of this call.
- The normal reason for this is that you are no longer assigned to the call. Contact your Project Manager for assistance.
You can't check into this call because you are still checked into another call.
- Find the call with the call ID shown.
- Check out of it.
Your device position accuracy is BAD (approximate). The settings on the project will not allow you to check in with an 'BAD' position. Try moving towards a window or move away from high rise buildings in order to improve your location accuracy. If this is not successful, contact your Project Manager for assistance.
Make sure the 'Location Service's facility is turned on (we recommend the 'High Accuracy' option on Android devices).
Settings can be found;
- Settings/Connections/Location and select the 'High Accuracy' option
Your device position accuracy is FAILED (unknown). The settings on the project will not allow you to check in with a 'FAILED' position. Try moving towards a window or move away from high rise buildings in order to improve your location accuracy. If this is not successful, contact your Project Manager for assistance.
Make sure the 'Location Service's facility is turned on (we recommend the 'High Accuracy' option on Android devices).
Settings can be found;
- Settings/Connections/Location and select the 'High Accuracy' option
You are unable to check in because the device 'Location Service's facility is disabled. To rectify this please switch this facility on;
Make sure the 'Location Service's facility turned on (we recommend the 'High Accuracy' option on Android devices). Settings can be found;
- Go to Settings/Connections/Location and select the 'High Accuracy' option
You are unable to check in as you have exceeded the maximum distance allowance between your device and the target. Please move closer to the location of your visit and try again. If this is not successful, contact your Project Manager for assistance.
To start entering the data into your call you must select the ‘Start’ button on the call page.
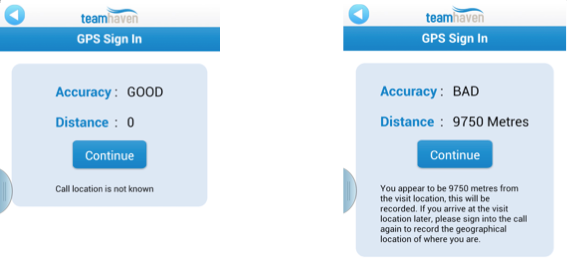
When you start a call, the GPS sign in screen is displayed. This screen will display how far away you appear to be from the target's location.
Note: This will be recorded; your Account Administrator will have access to this information.
For more information about the accuracy and distance sections see ‘Checking In’.
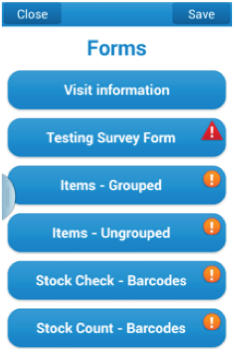
This screen displays an index of all the forms contained in the call's questionnaire. Each button represents a form in your questionnaire, to open a form select the appropriate form name.
You can navigate back to this page at any point by pressing the "Index" button at the top of the screen. (See Navigating between forms for more information).
Some form names may display a coloured icon; this will be either a red triangle or an orange circle. These icons will tell you if there are any errors in the form that may affect the save process.
![]() This icon will display if there is a format error with one of your question answers. This icon will also appear next to the offending question.
This icon will display if there is a format error with one of your question answers. This icon will also appear next to the offending question.
![]() This icon will display if there is a mandatory question left unanswered. You cannot save the questionnaire unless all mandatory questions are answered. These questions will display in orange.
This icon will display if there is a mandatory question left unanswered. You cannot save the questionnaire unless all mandatory questions are answered. These questions will display in orange.
Within a form you will see three buttons along the top bar, these will be used to navigate between the index page and your forms.
Back – This button will move you to the previous form.
Index – This button will return you to the form index.
Next – This button will move you to the next form.
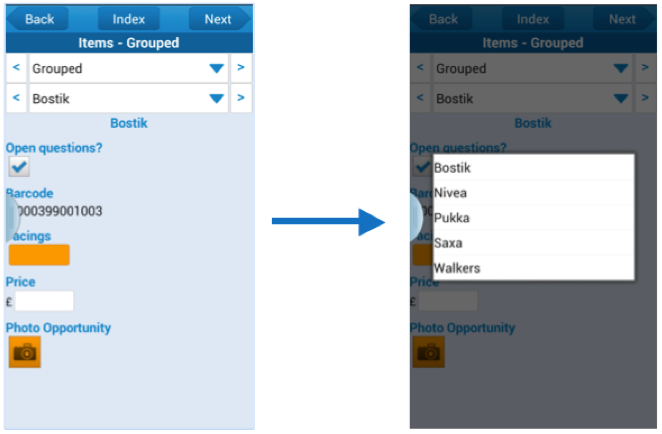
Items within a grid form can be grouped into categories; this may make viewing the questions slightly easier. If an item list is grouped, you will see the questions for each item individually, to move between groups and items you need to use the drop down boxes and select the appropriate group or item from the list. Alternatively, you can move between these by using the arrows on either side of the dropdown box.
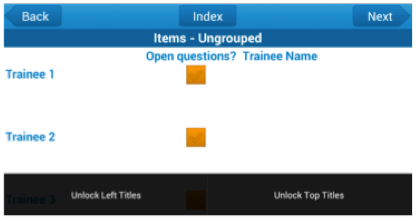
Some item lists may not be grouped, this means that all questions and items will display on one page.
To make viewing easier, the question titles and item titles can be locked in place; this means that they will be visible no matter where you are on the form.
However, you do have the option to unlock these titles, by selecting the ‘menu’ button (built into your android device) and then selecting the appropriate option. TeamHaven will remember your display preference for each form, so the titles will automatically be unlocked or locked when you enter your next call.
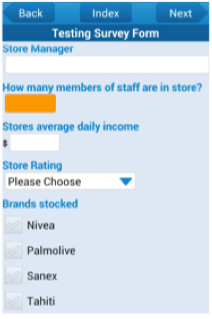
Survey forms will display a list of all questions on one page, there are no items attached to these forms.
There are lots of different types of questions that you may come across while entering your data, here you will find a brief description of each question type.
Hint: All mandatory questions will display in orange. These must all be answered before you can save your call.
There is no limit to the type of data that you can enter into these questions, although there is a limit to the amount. The device keyboard will open when you select the free text field.
Hint: if you have multiple text or numeric fields you can select the ‘next’ or enter button on the keyboard to move to the next one.
Numeric fields can only contain numbers and points, if you enter data that does not follow this format you will see the format error icon.
Note: Some numeric questions may have rules, for example “Only allowed 0 decimal places” – if you do not follow these rules the format error icon will display.
Single choice questions allow you to select one answer from a given list. To open the list you must touch the drop down box and then select you answer.
Multiple choice questions allow selecting one or more answers from a given list. To select an option select the tick box once, if you would like to unselect an option press it again.
Date and time question can display together or separately but each element will work the same either way. To select a date or time select the drop down box, this will open the date or time selector. Once you have selected the correct date or time choose ‘Set’.
Yes/No questions will display a tick box. If you would like to display a yes answer (ticked) press the box once, if you would like to display a no answer (un-ticked) press the box again.
Hint: By default, optional Yes/No questions will display a no answer. You will only need to tick these boxes twice for a no answer if the question is mandatory (this will display orange).
Picture questions will open the camera on your device.
To open the devices camera you will need to select the camera icon. If you would like to use an image that is already on your device hold your finger on the camera icon and select the appropriate image from your gallery. Your Project Manager has the ability to lock down this option.
Once you have captured your image you will see an image preview, if this is a suitable image select ‘Save’. If you would like to take a different image please select ‘Discard’. When you have selected save, your image will display in the form. If you would like to remove this select the ‘X’ next to the image.
To capture a signature select the pen icon, this will open the signature capture page. Select ‘Cancel’ to end your signature capture session.
‘Clear’ will remove your current signature. ‘Save’ will place your current signature into the questionnaire.
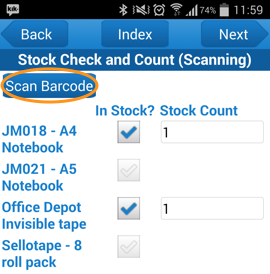
A ‘Scan Barcode’ button may be available in some of your grid forms; this function will open the device camera, which you can use to scan the item barcodes. This can be used to automatically answer one of two question types in a single form, a Yes/No question; for example ‘In stock?’ or a numeric question; for example ‘Quantity’.
Once you have pressed the ‘Scan Barcode’ button, hold your camera over the items barcode and wait for the red line to display green. Once you have scanned the item it will either display as ‘In stock?’ or will label the quantity as 1, depending on the question type.
Note: Barcode scanning will only work for item lists that are correctly set up, if you are having issues please contact your Account Administrator.
To save your call open the Index page – here you will find the save button. Once you have selected this, the call will move into the ‘Ready to Send’ section in the calls menu.
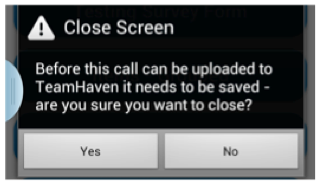
If you would like to close a call select the close button, you will be presented with a warning message, if you would like to continue select ‘Yes’ if you would like to cancel select ‘No’.
Just like checking in, the check out facility gives Project Managers the opportunity to track user activity throughout the day. The check in/out facility is project specific so Administrators have the ability to choose which of your projects would benefit from it.
If the check out facility is enabled, you must select the “Check Out” button on all calls before you can sync. The “Check Out” button is located between the “Start” and “Review” buttons when you have selected the “Save” button.
Once you have selected “Check Out” the details will appear on your screen, and it will include the date, time and GPS Information. You will need to select “Ok” to confirm the check out.
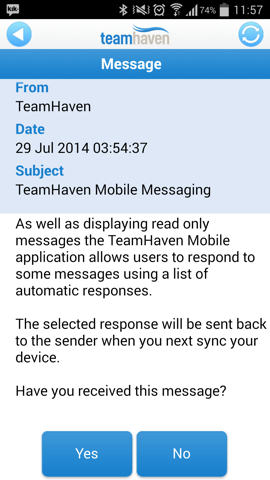
After you have synchronised, you may notice a notification on the messages button, this will tell you how many unread messages you have in your Inbox.
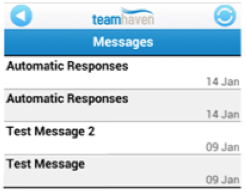
If you click on the Messages button, your Inbox will be displayed:
Unread messages are displayed in bold. You can open a message by tapping on it:
Some messages might have buttons at the bottom to allow you to send a short, pre-defined response back to the sender.
Note: TeamHaven Messaging is one-way: Project Managers can send you messages, but you can not compose new messages.
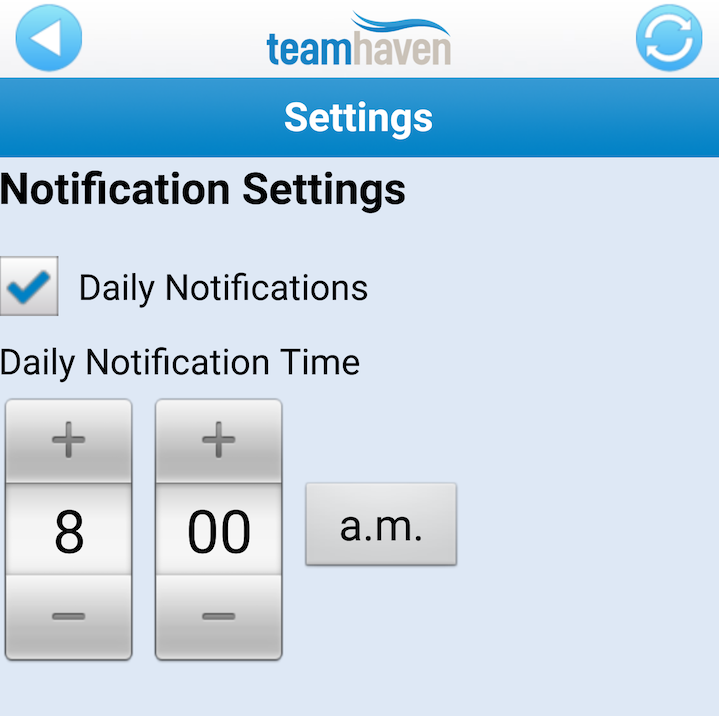
It is recommended that you do not adjust any of the TeamHaven Application settings before contacting your TeamHaven Account Manager; these are currently set so that the application will work at its best. However, there are some options that are customisable.
If you enable the notification in TeamHaven then the application will send you a single popup notification at the desired time of the day, every day.
The notification will contain the following information:
- number of calls: for todays date
- number of calls: fixed appointment and needs to be completed today
- Number of calls: that are within the critical margin and are getting close to latest date
- number of calls: that expire today
Use full keypad for numeric fields Android's numeric keyboard has a bug in it which prevents countries that use a comma to separate decimals from using it effectively, as commas are never displayed on the keyboard. If you are affected by this issue, you can enable the full keyboard in numeric fields.
Use GPS Sign In If this option is ticked then your location will be recorded when you start a call. If you remove the selection then the GPS Sign In page will not display.
Use External Barcode Reader Use this option if you would like to use an external device to record barcodes. Alternatively, you can use the devices camera to perform the barcode scanning function.
Form Font Size The font size be default is set to the optimal size the best support your device screen size but if you wish to change the size either to make it larger or smaller depending on your personal preference you can do that by opening the drop down menu and selecting a different size.
Smaller font will allow more to fit into the screen then before where larger size would take up more space. Please note that that devices with screen size 5 inch or over can be tilted to enable screen rotation, smaller device screen will not have this function.
Language There are a number of different languages available on the TeamHaven Android application. You can select your preferred language from the drop down list. If not utilized the language is automatically set as ‘Default’, this allows the application to pick up the language on your device.
Additional Settings You will find additional settings after the language selection for the TeamHaven server and sync frequency. Please do not change or edit these settings unless directed to do so by a TeamHaven Account Manager.
The support section should be used if and when you have an issue, this may include errors opening the app, starting a call or during general use. There are five options in the support section, these are:
Rebuild Database This option is similar to a synchronisation except it will remove and rebuild all of the data. You only need to use this option if instructed to do so by your Account Administrator as this will remove any previous cached data too.
Send Logfile If you have an issue the logfile is usually one of the first things that your Account Administrator will request, this will help TeamHaven locate the issue and makes finding a solution much faster. To send your logfile you will need a good internet connection.
Send Database In some cases the logfile that you submit using the above menu point may not give TeamHaven everything needed. TeamHaven may ask you to select 'Send database'. This will send your completed data to a developer who will then help to move this data on to TeamHaven.
Often, when TeamHaven ask you to do this, they will also create a temporary password for your account which will allow the Developer to perform the upload. You will be advised to reset your password as soon as the data has been uploaded on your behalf, so that you can continue to work.
Copy Photos to Gallery This option copies all the images from your completed calls into your device's photo gallery.
TeamHaven Guide Opens a web browser and displays the latest version of this user guide.
Note: If you come across any issues with the TeamHaven application please contact your Account Administrator.
You may notice a red circle on the calls button in the main menu, this will tell you the number of calls that are currently available in your call list. This does not include calls that are completed and ready to send. 
If you would like to Logout please select the icon in the top left corner of the main menu screen. Once you select the logout button you will be asked to confirm what you would like to do:
If you select Logout, then the app will close and you will also be logged out. If you select Exit, then the app will still be closed, but you won't have to log in again when you re-open it.
User Guide Languages:
